
Mr. Kelvin White Balance
A few weeks ago, I did a gear post that you can see here. In this post I talked about shooting in Kelvin White Balance and received a few questions about how this works. So first off, this is the way that I shoot, and isn't necessarily the perfect solution for everyone. I know tons of amazing photographers that don't shoot on Kelvin, and still have gorgeous pictures. It's something I learned early on in a Mike Colon workshop, and it has stuck with me ever since.
Now I'm not going to pretend like I'm a genius and try to explain the science behind shooting in Kelvin WB, because...well, I'm not a genius. I understand it very simply. Also, I'm a Nikon shooter...which is a HUGE benefit when it comes to Kelvin. On Canon cameras it's one or two extra steps to reach your Kelvin Setting (correct me if I'm wrong), but on Nikon, you literally hold down a button, and rotate a dial at the same time. Uber quick. You can do it with your eyes closed...literally (or while looking through the viewfinder). To me speed is everything, because while shooting a wedding, if you're fumbling with your settings, then you've missed a moment.
On your camera, there will be a WB button...somewhere. I wish every camera and camera manufacturer would put the white balance button in the same spot, but they don't. On my D300, it's on the top left of the camera. On my D3s, it's on the bottom for my left thumb. If you hold down that button, and scroll (usually with your thumb command dial), you'll see the different options for white balance. They go (in this order): Auto, Incandescent, Fluorescent, Direct Sunlight, Flash, Cloudy, Shade and then Kelvin.
Simply put, when you have Kelvin selected, you have the option of setting your color temperature from 2500K all the way up to 10,000K (degrees Kelvin). This is how I understand it in my mind: 2500K is very VERY blue, or cool WB, and 10000K is very VERY warm. So if you're taking a picture outside in the sun, and you're shooting at 4300K, and the skin tones are too cool and blue, then bump up your white balance to 5000K or 5500K to warm things up. At the beginning for me, it was all about experimenting. But now I understand that certain circumstances fall within a certain Kelvin range. For example, I know that if it's cloudy, or just after sunset, I know that I should be somewhere between 6000K and 7500K. I know if it's nice and sunny, then I should be at around 5000K and 5880K. If I'm indoors, depending on the lighting, I'm anywhere from 2500K to about 4000K. It's all about experimenting and getting to know that "sweet spot" where your skin tones look nearly perfect, not too cool, not too warm.
Now lets look at a few example shots. In each, I'll show the same picture from 2500K, all the way up to 9500K, in 1000 degree increments.
First screen shot example is an AWESOME couple I shot in Costa Rica:

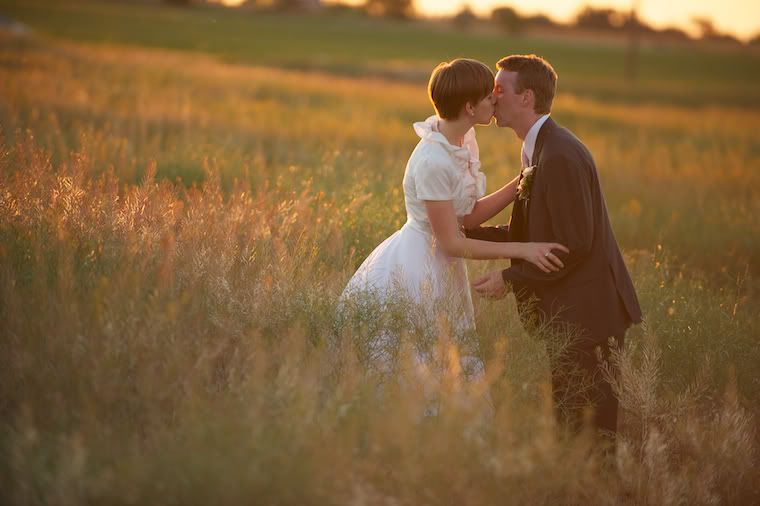
There's a lot of creative freedom for you to decide what looks "right" and where the sweet spot is, but for me I was going for as natural as possible. Here's the straight out of camera image that I shot at 5880K.

Example two is a super cute couple! At the very end of their wedding day right before the sun set, we decided to take a few shots in the beautiful field close by. Here's the screenshot from Apple Aperture:
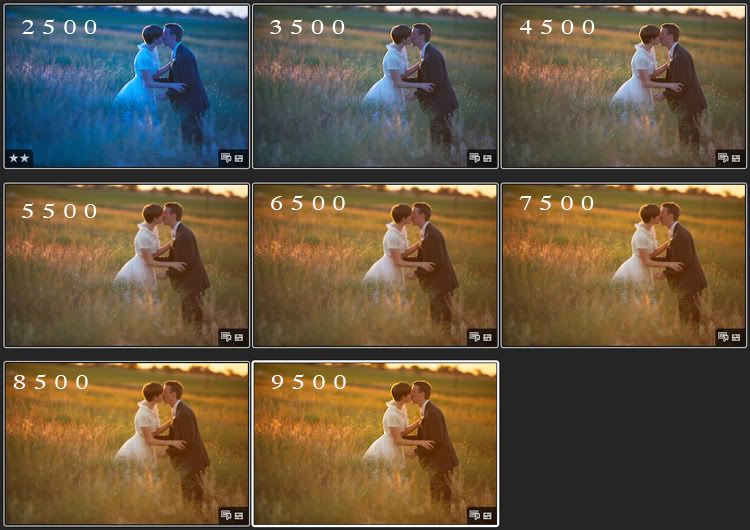
Again, there's not a TON of difference once you get to the higher degrees Kelvin, but here is the shot SOOC at 6250K.
Last one, an indoor shot of the Groom's father at a recent wedding.
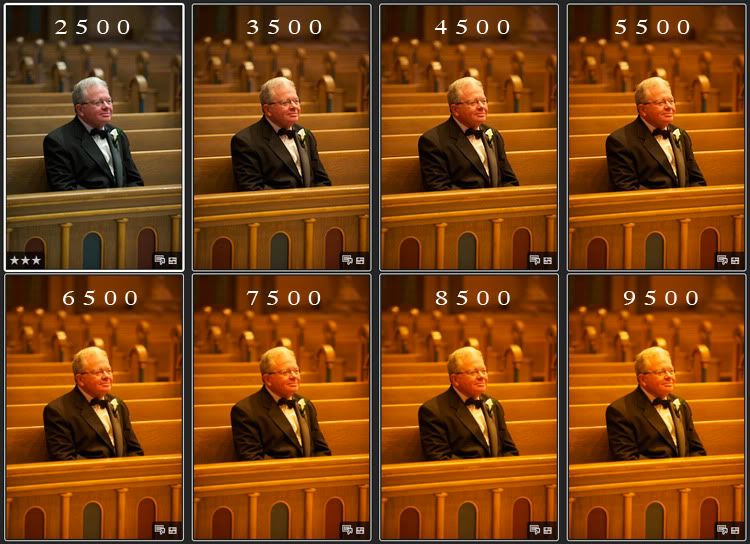
Notice how with indoor shots, or under Incandescent lighting, the sweet spot is right around 2500K-3000K depending on the lighting. Here's the SOOC shot at 2860K.

Here is a VERY generic rule of thumb for generally where you should be in different lighting circumstances:
Incandescent Lighting: 2500-3500
Fluorescent Lighting: 3500-4500
Daylight: 4800-5800
Shade/Cloudy: 6200-7500
And that's about it (unless you're using flash). Obviously these aren't set numbers. You can tweak as much as you'd like to find what looks natural to you. If you pick up your camera and you take a picture, and it's WAY to warm, or orange looking, then drop your degrees Kelvin. If you take a picture and it looks way to blueish, or cool, then increase your degrees Kelvin till it looks right. Pretty simple!
To me, there are two HUGE benefits to shooting in Kelvin:
1. You can get the EXACT color and skin tone that you want, straight out of the camera. If it's looking too cool, or too warm, you have complete control. On a shoot a few months ago, I thought I would try giving Auto WB a try. It lasted for about 15 shots. I like to get things straight out of the camera as close as possible to what I want my final image to look like. Because honestly, I don't LOVE sitting in front of a computer for hours on end trying to color correct. Not fun. I'd rather be shooting. When I learned this technique of white balance, it cut my editing time down TONS!
2. Consistency: To ME (again, not to everyone...I know many people who LOVE Auto WB), shooting on Auto WB is like shooting in full auto exposure mode on your camera. Your camera does the best it can, but in the end, you're bound to have under and over exposed shots because your camera was trying to do all the thinking. Same with shooting on Auto WB. When I personally have tried it in the past, some shots will be cool, some will be warm, some will be green, etc. They will ALL be very VERY close to great color, but CLOSE means I have to go in and color correct every image. For me, the auto WB rarely NAILED the color spot on. While on a shoot, once you find your sweet spot, you're ready to lock and load, or as Sachin Khona quoted, "Lock it, and rock it". All of your shots from that location and particular lighting condition will have beautiful and consistent color! LOVE IT!
This works for me, and for many other photographers (not EVERYONE), and if it works for you too, awesome! If not, no worries at all. Good luck, hope you enjoyed, and let me know if you have any questions!
6 comments:
Haha.. I wish I came up with that quote.. It is in fact Becker who I heard say that.. but its so true!!
Great post Nate..
Thanks for sharing
Sachin
Amazing post, and so informational, especially for me = novice photographer. I loved how simply, but thoroughly you explained everything. Thanks so much.
Thank you for explaining this so simply. I have seen that WB option but never used it. I will definitely be experimenting with it now that I understand it better.
Thank you so much for explaining that!!! Can't wait to try it!! I have been practicing manual for about two weeks on my D300s and I get ALOT of blue(WB AUTO)!!!! I will give Kelvin a shot!! Have a great weekend!!!
So first time commenter...long time blog stalker! haha. Thank you for posting this. I am going to try this out for sure. I think I'll be switching to Kelvin White Balance!. Now that the other technical aspects of shooting in Manual are second nature to me, I can concentrate on getting the white balance right. Thank you, Nate!
Nice write up
Post a Comment